
Varun Katyal | Founder, Clapboard
Varun Katyal is the Founder & CEO of Clapboard and a former Creative Director at Ogilvy, with 15+ years of experience across advertising, branded content, and film production. He built Clapboard after seeing firsthand that the industry’s traditional ways of sourcing talent, structuring teams, and delivering creative work were no longer built for the volume, velocity, and complexity of modern content. Clapboard is his answer — a video-first creative operating system that brings together a curated talent marketplace, managed production services, and an AI- and automation-powered layer into a single ecosystem for advertising, branded content, and film. It is designed for a market where brands need content at a scale, speed, and level of specialization that legacy agencies and generic freelance platforms were never built to deliver. The thinking, frameworks, and editorial perspective behind this blog are shaped by Varun’s experience across both the agency world and the emerging platform-led future of creative production. LinkedIn: https://www.linkedin.com/in/varun-katyal-clapboard/


The Appeal of Butterfly Lighting Photography in Portraiture
Why photographers choose butterfly lighting for portraits
Butterfly lighting photography has endured because it delivers what most clients and subjects crave: flattering portrait lighting that brings out the best in a face. By placing the key light directly above and in front of the subject, this setup sculpts cheekbones, defines the jawline, and creates a signature shadow under the nose—the “butterfly”—that signals both precision and intention. There’s nowhere for features to hide, but also nothing to distract from them. The result: faces look cleaner, bone structure pops, and imperfections recede.
Butterfly lighting for different face shapes
Not every lighting pattern is so democratic, but butterfly lighting adapts surprisingly well. On oval or heart-shaped faces, it amplifies symmetry and elegance. On round faces, it adds dimension and contour, avoiding the flattening effect of frontal fill. For older subjects, it minimizes lines and texture without the clinical harshness of a beauty dish. This is why butterfly lighting often surfaces in both glamour lighting and corporate headshots—two genres with wildly different goals, but a shared demand for facial feature enhancement.
Emotional tone set by butterfly lighting
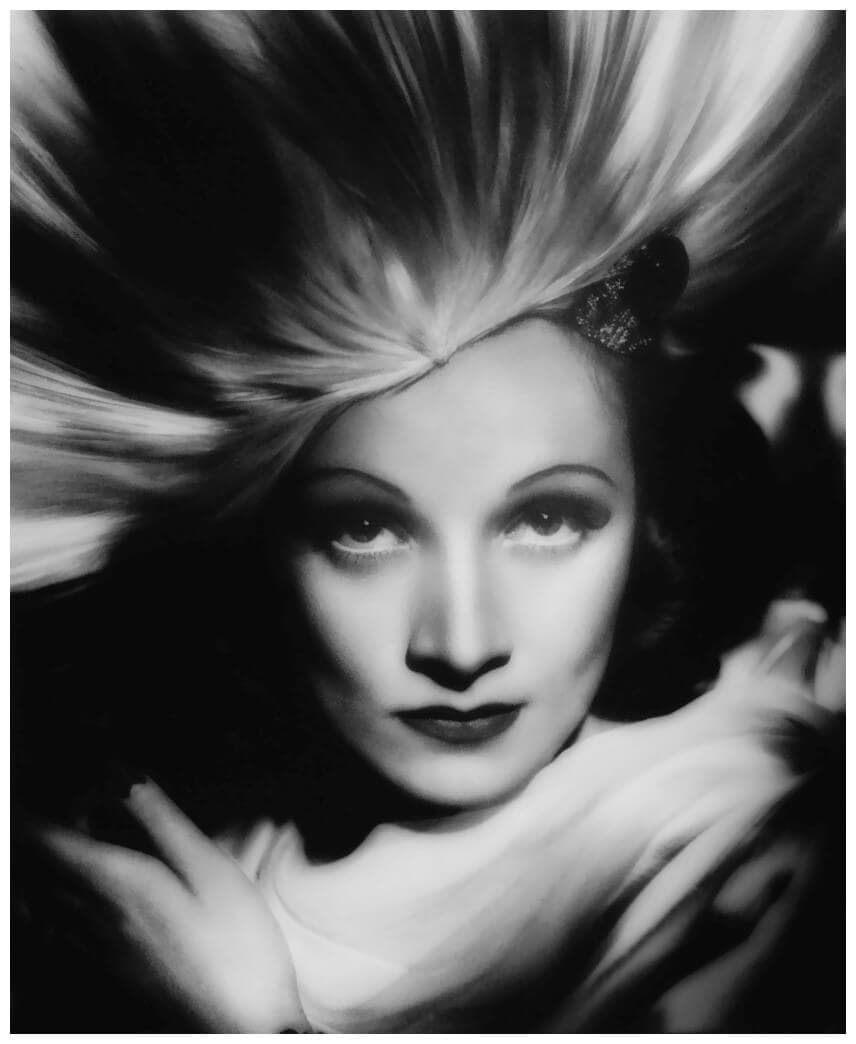
Butterfly lighting’s roots in classic Hollywood aren’t just a stylistic nod—they’re about mood. This setup projects confidence, approachability, and timelessness. The upward shadow hints at drama, but never overwhelms. In a commercial context, this can mean the difference between a portrait that simply documents and one that elevates. Used with intent, butterfly lighting photography doesn’t just flatter—it frames the subject as iconic, even aspirational.
What Is Butterfly Lighting Photography? Understanding the Basics
Butterfly lighting photography is a portrait lighting technique defined by a single, dominant light source placed directly in front of and slightly above the subject’s face. The result: a crisp, symmetrical shadow cast under the nose, resembling a butterfly’s wings. This is the butterfly lighting definition at its core—clean, controlled, and intentionally flattering for facial structure.
What does butterfly lighting look like in photos?
Visually, butterfly lighting creates a luminous, sculpted effect. Cheekbones are accentuated, jawlines sharpened, and the eyes catch a distinct, even sparkle. The hallmark is the subtle butterfly-shaped shadow beneath the nose, with minimal shadowing elsewhere on the face. It’s a look that feels polished yet natural, making it a staple for beauty and classic headshots.
Key features of butterfly lighting photography
This portrait lighting technique is prized for its ability to flatter a wide range of subjects. It smooths skin texture and reduces the appearance of wrinkles, which is why it’s favored in commercial and glamour portraiture. The setup is simple: a key light—often a softbox or beauty dish—positioned just above and in front of the camera, angled down toward the subject.
How butterfly lighting differs from other portrait techniques
Unlike Rembrandt or loop lighting, butterfly lighting is all about symmetry and minimalism. Rembrandt lighting, for example, uses a sidelight to carve dramatic triangles of shadow, while loop lighting introduces a gentle shadow off one side of the nose. Butterfly lighting, by contrast, is about control and directness—less drama, more refinement. For a deeper dive into lighting patterns explained or beginner portrait techniques, this method is foundational, not just fashionable.
Essential Gear and Setup for Butterfly Lighting Photography
Must-have gear for butterfly lighting photography
Every effective butterfly lighting setup starts with the right portrait lighting gear. You need a reliable key light—strobe or continuous—capable of consistent output and color. A large softbox or beauty dish is the modifier of choice, ensuring the signature shadow is crisp yet flattering. A reflector, preferably silver or white, is non-negotiable for controlling fill and sculpting the lower half of the face. If you’re serious about stability and flexibility, a boom arm paired with a C-stand lets you position the light directly above the subject without cluttering your frame (Imagen AI, 2026).
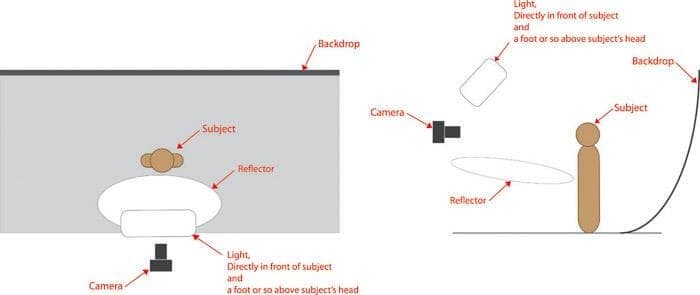
Setting up your key light and reflector
Butterfly lighting hinges on precision. The key light should be placed above the subject’s eye level, angled down at about 45 degrees—this is what creates the iconic butterfly shadow beneath the nose (Harlowe, 2026). The light must be centered with the subject’s face; even a slight shift throws off the symmetry. Pair this with a reflector positioned just below the chin, angled to bounce light back up and soften shadows under the jaw. This “clamshell” configuration delivers both definition and glamour.
Modifiers that improve butterfly lighting results
Modifiers are what separate a flat look from a sculpted portrait. A softbox diffuses harshness, while a beauty dish adds punch and specularity. Grid attachments help control spill and focus the beam. Optional tools, like wireless flash triggers, streamline workflow and keep the set uncluttered. For camera and lens, a full-frame body paired with an 85mm or 105mm prime delivers flattering compression and sharpness. The result: portraits that feel polished, intentional, and unmistakably professional.
Step-by-Step Guide: How to Set Up Butterfly Lighting Photography
Step-by-step butterfly lighting setup
If you want to master how to set up butterfly lighting photography, precision is non-negotiable. Start by placing your key light directly in front of the subject—slightly above eye level, at a 45-degree angle, and about four feet away. This is the foundation for creating the signature butterfly-shaped shadow under the nose (COLBOR, 2024). A boom arm is practical here, allowing the light to sit directly over the camera’s axis without the stand creeping into frame.
Next, position a reflector below the subject’s face, at waist level, angled up at 45 degrees and roughly two feet away. This fills the shadows under the chin, evening out contrast and preventing harsh drop-off (COLBOR, 2024). The reflector’s placement is as critical as the key light: too close and you’ll flatten the image; too far and you lose that sculpted softness butterfly lighting is known for.
Adjusting for perfect butterfly shadows
Fine-tune the key light’s height and angle to lock in a small, centered shadow beneath the nose. If the shadow spills onto the upper lip or chin, your light is either too high or too far back. Subtle shifts—sometimes just an inch—can make the difference between a crisp butterfly shadow and a distracting mess. Watch the catchlights in the eyes; they should be high but not lost in the upper lid.
Common mistakes and how to fix them
Misplaced lights and poorly angled reflectors are the usual culprits. If your shadows look muddy or asymmetrical, reset your angles and distances. Overexposed highlights? Dial down the key or move it back. For a deeper dive into nuanced portrait setups, see our portrait lighting guide and lighting setup walkthrough.
Creative Variations and Advanced Uses of Butterfly Lighting Photography
Creative variations on butterfly lighting
Advanced butterfly lighting photography is not locked to the classic playbook. The standard overhead key can be pushed—raising or lowering the light to exaggerate or soften the shadow under the nose, or angling the modifier for sharper cheekbones. A silver reflector adds punch; a black flag introduces deliberate falloff for a moodier, more sculpted result. These tweaks let you dial in everything from crisp editorial to painterly softness.
Mixing butterfly lighting with other techniques
Hybrid setups are where creative portrait lighting comes alive. Add a subtle kicker or rim light behind the subject to separate them from the background—this turns the symmetrical butterfly base into something cinematic. Gelled lights can inject color, shifting the emotional temperature. Layering patterns, like blending clamshell fill with a grid spot, creates depth and drama without sacrificing the classic structure.
Advanced tips for dramatic portrait effects
Don’t treat butterfly lighting as a one-trick pony. Use it on non-traditional subjects: group shots, fashion, even product photography for a graphic, stylized look. For dramatic lighting techniques, try cutting the fill entirely and letting the shadows deepen—this is high-stakes, but it commands attention. Always test modifiers and ratios on-set, not in theory. Push boundaries, but keep safety in mind: stable stands, secure modifiers, and clear communication prevent on-set mishaps.
Advanced butterfly lighting photography rewards experimentation. The best images often come from breaking the rules with intent and control. Master the foundation, then let your creative instincts take over.

Common Mistakes and Troubleshooting in Butterfly Lighting Photography
Common butterfly lighting photography mistakes
Most butterfly lighting photography mistakes come down to control. The classic error is placing the key light too high or too close, which carves out deep, unflattering shadows under the nose and chin. Another frequent misstep: hard, undiffused light that exaggerates skin texture and creates harsh contrast, especially on faces with strong features. Overlooking fill—whether from a reflector or bounce—leaves the lower half of the face in shadow, killing the signature glow of butterfly lighting. Watch for uneven backgrounds or color shifts, especially in mixed-light locations.
How to fix bad butterfly lighting results
Troubleshooting portrait lighting starts with observation. If shadows are too heavy, lower the key light or add diffusion. A reflector just below the subject’s chin will soften and lift shadows, restoring balance. For correcting lighting errors like hot spots or glare, feather the light or use a larger modifier. If the subject’s eyes lose catchlights, adjust the angle until you see that signature sparkle in both irises. Small tweaks—centimeters, not meters—often make the difference.
Adjusting for different subjects and settings
Face shape and environment demand adaptation. For angular faces, soften the light and bring the source slightly closer to camera axis to minimize harshness. In cramped or reflective spaces, flag off unwanted bounce or use black foamcore to control spill. Evaluate every shot on set: check the histogram, zoom in on skin detail, and trust your eye. A systematic approach to fixing portrait shadows and common lighting problems separates the technician from the artist.
Conclusion
Butterfly lighting stands as a cornerstone portrait lighting technique, not because it’s trendy, but because it’s relentlessly effective. At its core, it delivers a flattering portrait lighting look that elevates facial structure without resorting to gimmickry. The shadow under the nose, the gentle lift to cheekbones—these are not just aesthetic flourishes, but visual cues that communicate clarity and intent. For any creative leader or marketer invested in visual storytelling, understanding why this setup works is as crucial as knowing how to deploy it.
What sets butterfly lighting apart is its adaptability. On set, it’s the rare lighting approach that can move seamlessly from classic beauty to contemporary edge, simply by adjusting the key light’s height or adding a fill. It’s a technique that rewards technical precision but leaves room for creative portrait lighting experimentation. Whether you’re working with a tight timeline or a demanding client brief, butterfly lighting offers a reliable foundation—one that can be dialed up for drama or softened for approachability.
Mastering butterfly lighting isn’t about chasing perfection. It’s about understanding the interplay of light, shadow, and subject, and making deliberate choices that serve the story and the brand. The best portrait photography styles aren’t defined by rigid rules, but by the confidence to adapt and refine foundational techniques. Butterfly lighting, in the hands of a practitioner who respects both craft and context, remains one of the most versatile tools in the portrait arsenal.
In the end, it’s not just about technique—it’s about building a visual language that resonates. Butterfly lighting is a starting point, not a finish line. Use it, adapt it, and let it serve the narrative you’re crafting.
FAQs
What is butterfly lighting?
Butterfly lighting is a portrait lighting technique where the key light is placed directly in front of and slightly above the subject’s face. This setup casts a symmetrical, butterfly-shaped shadow under the nose, creating a clean, sculpted look that’s often used in beauty and glamour photography.
How to capture butterfly lighting?
To capture butterfly lighting, position your main light source just above the camera and angle it down toward the subject. Keep the light centered to maintain symmetry. Fine-tune the height and angle until the shadow beneath the nose forms a distinct butterfly pattern, without overpowering the rest of the features.
What equipment do I need for butterfly lighting?
Essential gear includes a reliable key light (strobe, LED panel, or softbox), a light stand, and a reflector. The reflector is typically placed below the subject’s chin to soften shadows and control contrast. Optional modifiers like beauty dishes or diffusers can further refine the quality of light.
How to set up butterfly lighting photography?
Start by placing your key light above and directly in front of your subject. Adjust the height so it’s just above eye level, angled slightly downward. Position a reflector below the chin, angled upward. Test exposure and tweak the distance or angle for optimal shadow definition and skin tone.
What are common mistakes in butterfly lighting photography?
Common errors include placing the light too high, which elongates shadows unnaturally, or too low, which flattens facial features. Skipping the reflector can lead to harsh shadows. Overexposing the face or losing catchlights in the eyes are also frequent pitfalls. Precision in placement is non-negotiable.
How does butterfly lighting enhance facial features?
Butterfly lighting accentuates cheekbones and jawlines by creating subtle shadows beneath the nose and chin. It brings out bone structure without exaggerating flaws, giving portraits a refined, dimensional quality. This method flatters most faces, lending a classic, almost cinematic polish to the subject.
What are creative variations of butterfly lighting?
Advanced variations include using colored gels on the key light for mood, introducing a rim or hair light for separation, or manipulating the reflector’s angle to shape shadow intensity. Some experiment with hard light for drama or soft light for a more ethereal effect, adapting the core principle to suit the brief.


LEAVE A COMMENT
Your email address will not be published.